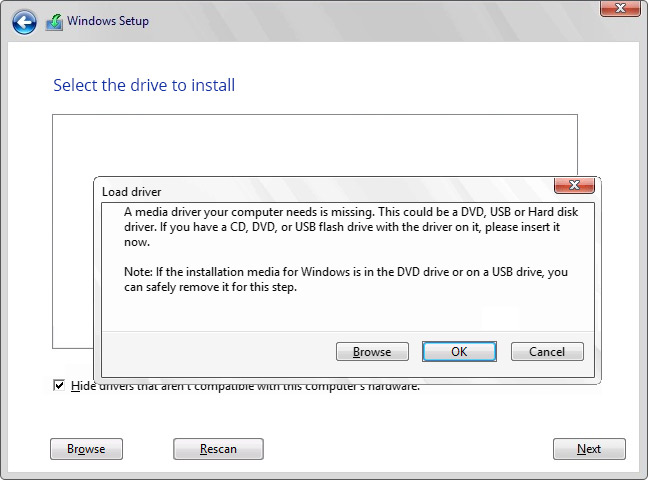
The “drive missing” issue during OS installation happens because the operating system’s installer cannot detect or access the storage device. This can result from several hardware or software factors. Here are the most common reasons:
1. Missing Storage Drivers
- Cause: The OS installation media lacks the required drivers for the storage device (e.g., NVMe SSD, RAID arrays).
- Example: Older Windows installers may not include drivers for modern NVMe drives.
- Solution: Load the necessary drivers during installation.
2. Incorrect BIOS/UEFI Settings
- Cause: Misconfigured BIOS settings, such as SATA mode, are set to RAID instead of AHCI.
- For example, Intel VMD or Secure Boot settings might block drive detection.
- Solution: Adjust settings like SATA mode, disable Secure Boot, or enable VMD (if needed).
3. Uninitialized or Unformatted Drive
- Cause: A new or unpartitioned drive won’t appear during installation.
- Example: A brand-new SSD is uninitialized.
- Solution: Initialize and partition the drive using tools like DiskPart.
4. Partition Table Mismatch
- Cause: The drive’s partition table (MBR or GPT) doesn’t match the system’s boot mode (Legacy or UEFI).
- Example: A GPT disk with Legacy BIOS boot mode will not work.
- Solution: Reconfigure the partition table to match the boot mode.
5. Faulty or Loose Hardware Connections
- Cause: Physical issues like loose or damaged cables can prevent the installer from detecting the drive.
- Example: A loose SATA or NVMe connection.
- Solution: Check and secure all connections.
6. Outdated BIOS/UEFI Firmware
- Cause: Older firmware may not support new storage technologies like NVMe or large-capacity drives.
- Example: A motherboard with outdated firmware can’t detect modern SSDs.
- Solution: Update the BIOS to the latest version.
7. RAID Configuration Issues
- Cause: If RAID is enabled but the necessary drivers are missing, the drive won’t be detected.
- Example: A system set up for RAID but using a default installer without RAID drivers.
- Solution: Load RAID drivers or switch to AHCI mode.
8. Faulty or Failing Drive
- Cause: The drive may be damaged or failing, making it undetectable.
- Example: A hard disk with mechanical issues.
- Solution: Test the drive on another system or run diagnostic tools.
9. OS Installation Media Issues
- Cause: Incompatible or outdated installation media may lack support for modern storage devices.
- Example: Using an older Windows version without NVMe driver support.
- Solution: Create updated installation media using tools like Rufus with the latest OS version.
10. Secure Boot or TPM Restrictions
- Cause: Secure Boot or TPM can block the installer from accessing the drive.
- Example: Secure Boot blocks unsigned drivers.
- Solution: Temporarily disable Secure Boot in the BIOS.
If the drive is missing while installing an operating system, follow these steps to identify and resolve the issue:
1. Verify Physical Connections
- Check Cables: Ensure secure SATA, power, or NVMe connections to the storage device.
- Test the Drive: Connect the drive to another computer to confirm it works.
2. Configure BIOS/UEFI Settings
- Set SATA Mode to AHCI:
- Enter BIOS/UEFI by pressing the appropriate key during boot (e.g., F2, DEL, or ESC).
- Locate SATA Mode and set it to AHCI (instead of RAID or IDE).
- Enable/Disable VMD Controller: For systems with Intel’s VMD, enable it in BIOS.
- Disable Secure Boot Temporarily:
- Navigate to the Secure Boot option in BIOS.
- Set it to “Disabled.”
- Check Boot Mode:
- Ensure the boot mode matches the partition table (UEFI for GPT or Legacy for MBR).
3. Load Storage Drivers
- During installation, select Load Driver when no drives are detected.
- Download the necessary storage drivers (e.g., SATA, NVMe, RAID) from the motherboard or storage device manufacturer’s website.
- Copy the drivers to a USB drive and load them during the OS installation.
4. Use Disk Management Tools
- Boot into the installation media.
- Press Shift + F10 to open Command Prompt.
- Run
diskpart:- Type
list diskto check if the drive is recognized. - If it appears, initialize it: select disk X # Replace X with the disk number
- clean
- convert GPT # Use ‘convert MRB’ for legacy systems
- create partition primary
- format fs=ntfs quick
- exit
- Type
- Retry the installation.
5. Update BIOS/UEFI Firmware
- Visit the motherboard manufacturer’s website to download the latest BIOS update.
- Follow their instructions to update your firmware.
6. Test the Drive for Failures
- Use diagnostic tools such as:
- CrystalDiskInfo for Windows.
- SMART tools for Linux or built-in diagnostic software from the drive’s manufacturer.
- Replace the drive if errors are detected.
7. Use Compatible Installation Media
- Ensure your installation media supports the storage technology (e.g., NVMe SSDs).
- Download the latest version of the operating system.
- Use tools like Rufus to create a bootable USB with appropriate partition scheme (GPT or MBR).
8. Recheck Partition Table Compatibility
- For UEFI, ensure the drive is GPT.
- For Legacy BIOS, use MBR. Convert the partition table if necessary using
diskpartor third-party software.
9. Disable Intel Optane or RAID (If Present)
- In BIOS, disable Intel Optane or RAID if not using these features.
- Set the storage controller to AHCI.
10. Try an Alternate Port or Device
- Switch the drive to a different SATA or NVMe port.
- Test with a different drive to isolate the issue.
To find out about our services,
- Contact us.


