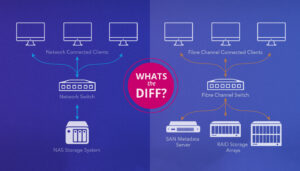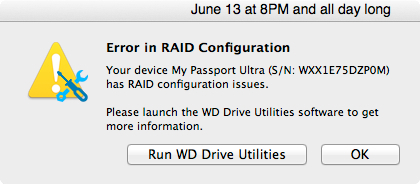
RAID (Redundant Array of Independent Disks) is a storage configuration that combines multiple drives for performance, redundancy, or both. Issues with RAID configuration during OS installation can lead to the “drive missing” problem. Here’s a breakdown of the causes and solutions:
Causes of RAID Configuration Issues
- Missing RAID Drivers
- Description: The OS installation media lacks the required RAID drivers to recognize the array.
- Example: Windows may not natively include RAID drivers for certain Intel or AMD controllers.
- Impact: The RAID array isn’t detected, appearing as “no drives found.”
- Incorrect RAID Settings in BIOS/UEFI
- Description: RAID mode is enabled, but the configuration is incomplete or mismatched with the connected drives.
- Example: A drive is missing from the RAID array, or RAID is enabled without any array set up.
- Impact: The installer cannot identify the RAID volume.
- Outdated RAID Firmware
- Description: The RAID controller’s firmware is outdated and incompatible with modern OS installers.
- Example: An older RAID controller struggles to work with NVMe SSDs in RAID.
- Impact: The RAID setup is not visible to the OS.
- Physical Issues with RAID Drives
- Description: One or more drives in the RAID array are faulty or poorly connected.
- Example: A loose SATA cable or failed hard drive in the array.
- Impact: The RAID array becomes degraded or fails.
- Incompatible RAID Level
- Description: The RAID level (e.g., RAID 0, 1, 5, 10) may not be supported by the OS installer or hardware.
- Example: RAID 5 requires specific drivers or firmware to be detected correctly.
- Impact: The RAID volume doesn’t appear during installation.
Solutions to RAID Configuration Issues
1. Load RAID Drivers During Installation
- Steps:
- Download the RAID drivers from the motherboard or RAID controller manufacturer’s website.
- Place the drivers on a USB drive.
- Select “Load Driver” when no drives are detected during OS installation.
- Browse the locations of the drivers and load them.
- Result: The installer can detect and use the RAID array.
2. Verify RAID Configuration in BIOS/UEFI
- Steps:
- Press the appropriate key during startup to enter the BIOS/UEFI settings (e.g., F2, DEL, or ESC).
- Navigate to the RAID configuration menu.
- Ensure:
- RAID mode is enabled.
- The RAID array is properly configured.
- Save changes and exit.
- Result: The installer recognizes the RAID array.
3. Update RAID Controller Firmware
- Steps:
- Visit the RAID controller or motherboard manufacturer’s website.
- Download the latest firmware and update tool.
- Follow the manufacturer’s instructions to update the firmware.
- Result: Improved compatibility with modern OS installers and storage devices.
4. Check Physical Connections
- Steps:
- Power down the system and disconnect all drives.
- Reconnect each drive securely, ensuring proper SATA cables and power connection placement.
- Test each drive for faults using diagnostic tools.
- Result: Ensures the RAID array is healthy and functional.
5. Rebuild or Recreate the RAID Array
- Steps:
- Access the RAID configuration utility in BIOS/UEFI.
- Delete the existing RAID array (if degraded or corrupted).
- Recreate the RAID array with the desired RAID level (e.g., RAID 0 for performance, RAID 1 for redundancy).
- Save the changes and restart.
- Result: A properly configured RAID array ready for OS installation.
6. Use AHCI Mode if RAID Is Not Necessary
- Steps:
- Enter the BIOS/UEFI settings.
- Change the SATA mode from RAID to AHCI.
- Save changes and restart.
- Result: The system will treat drives as individual units instead of a RAID array, which may simplify installation.
7. Test the Drives Individually
- Steps:
- Disconnect all drives except one.
- Test each drive by connecting it to another system or running diagnostics.
- Replace any faulty drives and recreate the RAID array.
- Result: Ensures no faulty drive is causing the RAID array to fail.
To find out about our services,
- Contact us.